As winter sets in, Jonny’s Impala Super Sport lowrider project receives rear lights, a dash and numerous other time-consuming trim additions. It looks on track to be finished by spring 2018 – 10 years since it was repainted. Better late than…
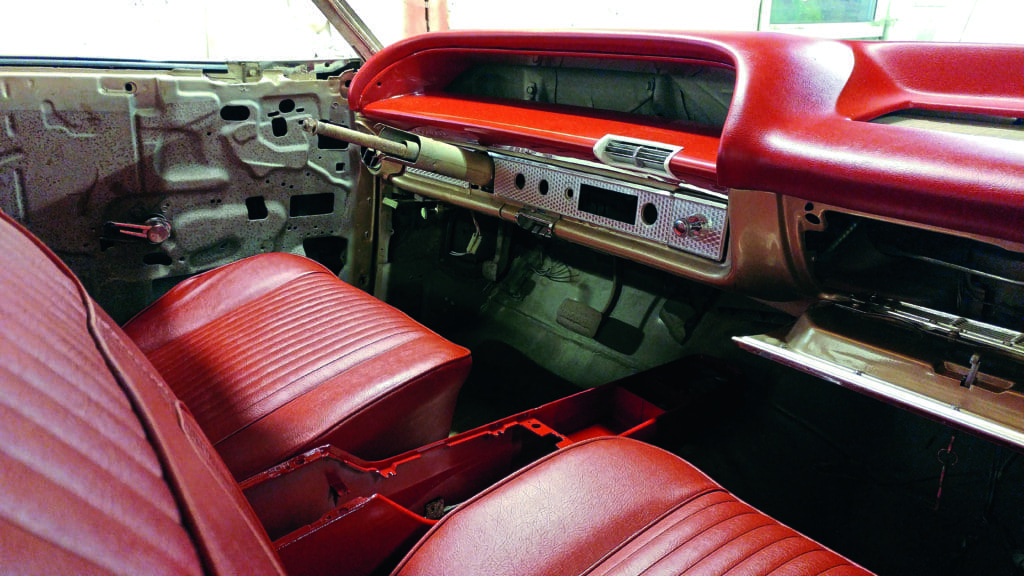
Remember last time we had an issue with a crumbling plastic central dash vent? While the ’64 Impala has a huge aftermarket parts availability, this small but very visible vent is no longer available. I chose to have Tim Oldland of www.modernclassicparts.com take a 3D scan of it. He then added the radius curve of the missing parts and pressed the ‘print’ button. Sure enough, we now have a vent housing that fits bob-on into the dash and is ready for paint.
Enjoy more Classic American reading in the monthly magazine.
Click here to subscribe & save.
For all things Classic American, like our page on Facebook here!
I maintain that this process is a game changer in our classic car world. If you are stuck for a bit then contact Tim rather than spend weeks trawling the internet for brittle parts. Of course, now that the data measurements of my Impala vent are on CAD file, Tim can reprint these easily. In a few years we may have an entire database of American bits to print and fit.
IN A DASH
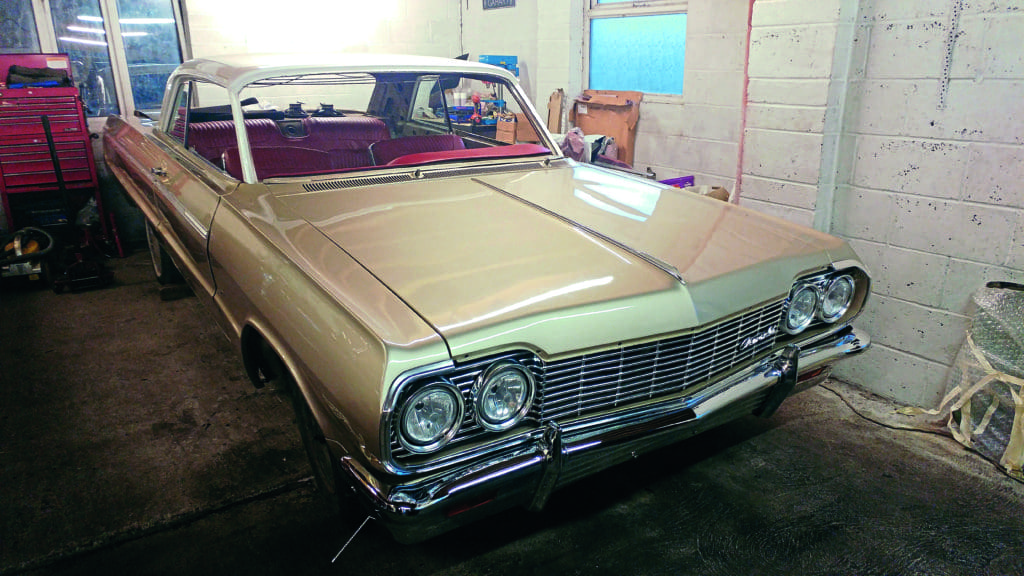
In order to trial fit the aforementioned 3D printed vent housing, Simon Browse at Arrow Cars (www.arrowvintagecars.co.uk) in Essex first had to offer up the Impala’s horizontal gauge cluster and its metal surround. Next the new dash top pad could be fitted. This is a repro item made from durable glassfibre and it was at this point that the car’s champagne metallic body colour meets the red upholstery.
Sticking with dash related jobs Simon painstakingly cleaned the original SS machine turned trim strips. As they all were salvageable we decided to not bother using the repro set, as they’re no where near as good quality. Besides, if you’ve been following the build you’ll know I prefer to preserve as much real Chevrolet as possible.
Before the trims were pushed on, there was a very unsightly hole where a later model radio was retro-fitted at some point. The hacked hole has been tidied, even though it was never going to be visible. Same story on the rear parcel shelf – more on that in a tick.
During the last decade of part squirreling for this car I’d ended up with several ash trays, but the correct one was added. Research has said that apparently if a ’64 Impala was fitted with factory air conditioning like mine, the central vent would blow ash/embers out of the ashtray. As a quick fix, GM added an additional ash tray beneath the dash. I don’t smoke so it’ll be used for a secret USB charge-port. Simon painted it and in it went.
Talking of A/C, the original air con air vent pods at either end of the dash were painted body colour by by Tim Glover at Roadhouse Retro and put back in. I don’t need the AC to work any longe,r but Simon will fit these up as ducted fresh air vents. The vent balls were added and organ pull controls bolted in place. These still need a touch more lubing to operate smoothly. The last part of the dash at this time was the glovebox. Simon broke out his jeweller’s rubbing compound and brought the mazak ‘IMPALA’ emblem strip back a treat. Yep you’ve guessed it – that’s the original trim.
PANE IN THE GLASS
Simon was hoping to have the windscreen and rear screen fitted by now, but we are one metal bow short, which means the headliner has to wait – and that needs to go in before the screens. There’s one arriving from the US any week now. No idea where it went, frustratingly.
The side glass, however, was ripe for refitment. My SS was specced from factory with green tinted glass, so Simon carefully removed the frames from the glass on their runners. New rubbers and chrome frames were then installed with sealant. The glass had accumulated a lot of debris that was dried on, so they had a bath in Simon’s baking soda/vinegar recipe for a few hours. He’s no Bake Off candidate, but a bath of 4 litres water, 3 table spoons baking soda and 2 table spoons of vinegar sorts out any scummy grime. Simon swears by it. Clearly this recipe works. Who needs aggressive chemicals?
After a skimming with a razor blade to remove impurities, then clay bar (yep, Simon takes pride in his work!) and glass cleaner they looked spanking. The glass runners weren’t so preserved. Over the years the runner had become separated from the spot-welded joints on the lower glass frames. These were all cut off, cleaned and rewelded back on, regardless of whether they were attached.
REAR SEAT SPEAKER
The upholstery was recovered years ago, so now that is starting to go in the bright work all needs bringing up to scratch. The ’64 has a feature central speaker grille featuring a ‘leaping Impala’ logo. It was restored with lubircated scotchbrite to remove surface corrosion staining and brought back to bling with jeweller’s rubbing compound, followed by Autosol.
THE BACK END
In the same annoying way that one headliner bow has gone walkabout in the last decade, so has one rear bumper iron. Whilst I’m hunting for a replacement Simon fitted what he could at the rear of the Impala. Using his proven jewellery cleaner he restored the original boot lid ‘wind split’ spear trim piece and then refitted it with new fastner sets previously bought.
For all things Classic American, like our page on Facebook here!
Like the rest of the trim, it’s not perfect but it is in keeping with the rest of the bootlid brightwork. And I like seeing the 50-year old bits win over non-genuine ill fitting stuff probably not even made in America. Simon had to make a custom clip for the very end of the spear (where it widens) because the aftermarket ones were, frankly, crap.
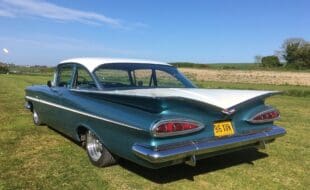
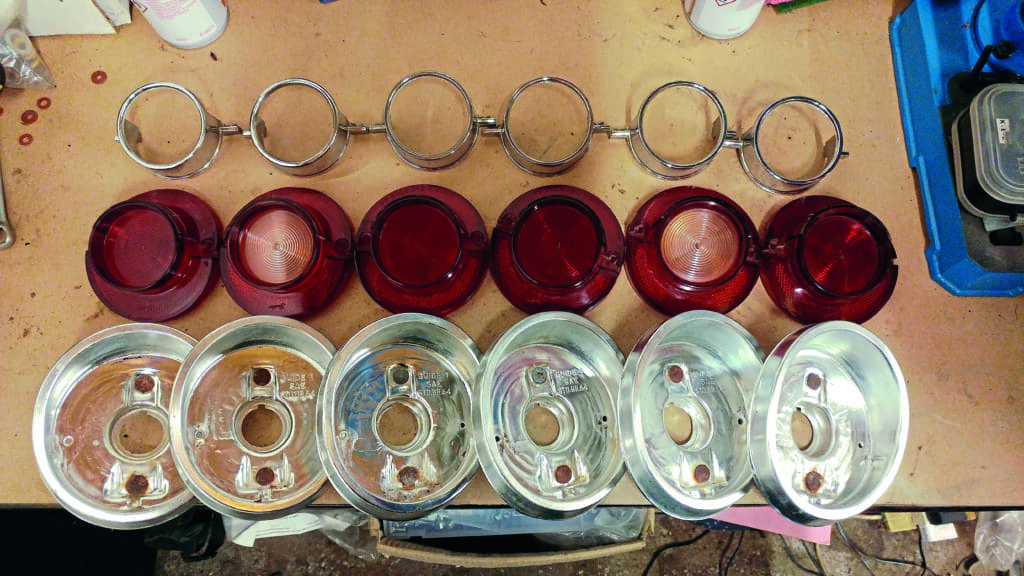
REAR LENSES AND SURROUNDS
Staying at the back, all the original iconic porthole lights managed to be saved. Little did I know but the SS lenses differ from the lower ranking Impalas because of the chrome ring attached to a ‘T’ guard. More chrome to the centre lens means it’s more special, basically. A vinegar/baking soda bathing session had the lenses degunked and then Si polished and Bilt Hamber waxed them before the chrome being added. I already had a new set of foam seals for the rear lights. So apart from the rear bumper, the rear end is almost there now.
To read more, you can purchase a back copy of our January 2018 edition here!
For all things Classic American, like our page on Facebook here!